


Things around the house keep breaking from time to time. You might be moving furniture around the house or you might have dropped a heavy utensil on the floor to see a large crack on your floor tiles. Floor tiles are often an unfortunate victim of most household accidents. Or you might not have broken your floor tiles at all but your tiles might have gotten worn out from years of usage.
Lucky for you, however, you don’t need to live in a home with either broken or old unsightly tiles that could project a safety risk to your home and hygiene. This expert step-by-step guide will tell you how to replace old tiling in your home without needing a handyman in NYC.
This guide will help you remove any broken tiles and replace them to make your floors look as good as new.
What You Need to Remove and Replace a Broken Tile
Before you start taking your tiles out, you need to make sure that you have all the tools and materials at hand. To remove and replace your floor tiles, you will need the following materials:
- A replacement tile
- Grout
- Tile adhesive
- Masking tape
Make sure that you have these tools handy to avoid any last-minute hassle:
- Grout remover
- Hard tipped drill bits
- Chisel
- Combi drill
- Grout spreader
- A soft cloth
- Bucket of sponge and water
- Brush and a dustpan
- Dust sheet
- Tile spacers that have been measured previously to fit your tiles
- Hammer
- Trimming knife that ideally comes with a 2-3 inch blade and a few handy replacement blades
There is nothing more important than safety when you work on home improvement with proper tools. Here are some safety tools that you absolutely need before starting this process:
- Dust mask
- Protective glasses
- Heavy-duty gloves
Ensure adequate safety
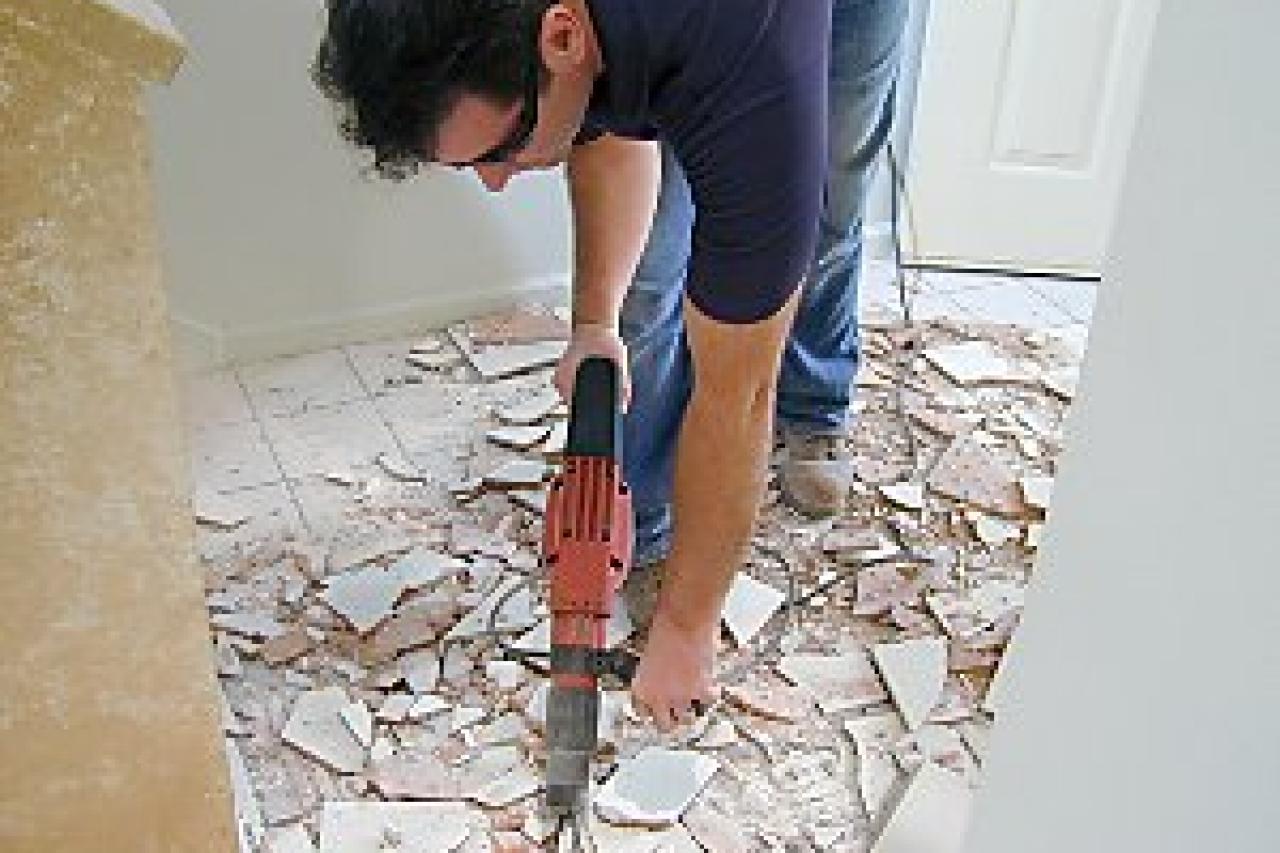
When you remove a broken tile, you need to chip it out with a chisel and hammer. This is a tricky task that can create a mess of dust particles and have bits of broken tiles flying everywhere. Some people might suffer from breathing irritation due to this. Make sure that you use a face mask at all times. A face mask can resolve any issues with dust. Wear protective glasses to ensure that small fragments of broken tile stay away from your eye. These small pieces are very sharp and can cause severe damage to your eye.
6 steps to remove and replace old tiling
Step 1: Clear the surrounding area
You need to start by making sure that the area you need to work in is clear. You should remove any obstacles that might interfere with your work. Remember that removing a tile is essentially a messy job. You should lay down a dust sheet to help collect any dust, debris, and pieces of broken tile. This makes it much easier to clean up afterward. Make sure that you remove any dust attracting furniture such as lounge chairs from the area. Also, make sure that all plugholes are properly covered as the fragments from the broken tile can collect and cause blockages.
Step 2: Remove the grout
Use the grout remover to make the grout around your tiles lose. You should lay down some masking tape around the center of the tile you need to remove to make sure that you do not accidentally move and damage any of the other, surrounding tiles. Then start removing the group using a grout rake or a trimming knife.
Make sure that no amount of grout is left in between two tiles. This is especially important as any leftover grout can create compression between two adjacent tiles. This compression can in turn make them chip off the glaze and cause even more problems.
Step 3: Drill into the tile
Make sure that you don’t drill too deep. You need to keep any cables or pipes in your flooring safe. Don’t compromise with the foundational structure of your floor or tile. You should ideally start drilling at low speeds into the masking tape that you laid out in the center of the broken tile. Once you create a hole, you can drill a little faster as long as you are careful.
Step 4: Chip out the center of the broken tile
Use your chisel inside the holes that you created using your drill and start removing the center of your broken tiles. You need to make sure that you are not too rough with this process of chipping the tile off. Gently tap and remove the center part and slowly move out to the sides of the tile. Make sure that you don’t veer off into any surrounding tiles. You can also scrape out any remaining adhesive material by using your trimming knife.
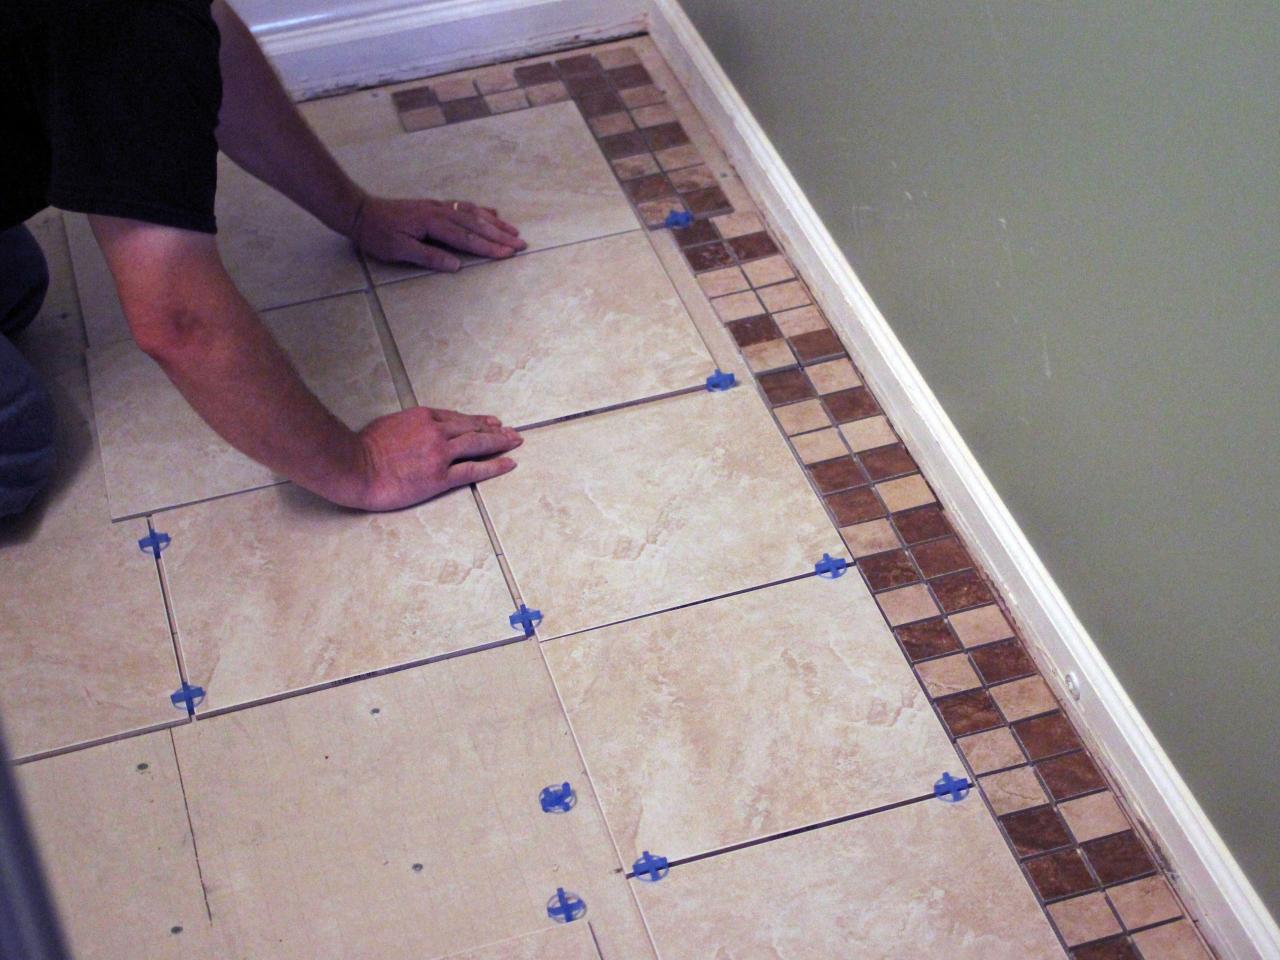
Step 5: Insert the new tile
The first thing you need to do is check that the tile you want to place does not protrude farther out than any other tiles. Just place your tile into the area that you have created without using any adhesives. If it doesn’t fit perfectly on the area, you need to remove any old adhesive that might have been left before you can fit your new tile.
Once it starts to fit perfectly, take it out and cover the back of the replacement tile with adhesive. Spread this adhesive evenly with a grout spreader and bring it into position firmly inside the gap. Make sure that your new tile is symmetrical with all the old ones.
Step 6: Secure the new tile in place
Once your new tile is fitted perfectly, you need to secure it with grout. Not only will it make sure that your tile doesn’t move but it will also keep the dust and debris away from collecting in the grooves of the tile. To grout your tile, start by fitting the tile spacers in place to maintain the space for the new grout. This will also stop the tile from slipping out or changing position before the adhesive dries. Let it dry for about 24 hours and remove the tile spacers. You can now add the new grout into the space around the new tile.

0 Comments.