


Industry experts have recently alleged that men have lost interest in DIY projects and knowledge & skill they had inherited from the previous generation. Not just that, someone has said that today’s generation is too weak to perform DIY on their own. First statement seems legit up to a certain point but second one is something that seems hard to digest, because every now and then we see a new DIYer hitting the headlines for various homemade projects. Be it a simple home painting project or a complex one like making a car or bike in garage, today’s generation is equally fascinated to the DIY world as were our ancestors.
Today’s generation is quite comfortable if they have to spend a few hours of their valuable weekend fixing the drain pipes in order to prepare for the holiday season. And if we talk about holiday season, then there are, certainly, a lot of simple to moderate DIY projects that you can perform to decorate your home for thanksgiving and Christmas. And the first thing that strikes my mind while thinking of holiday season decoration is a lot of lights. Then why not discuss an idea that plays around with trashed things lying in your backyard shed and some electricity work like the one suggested by a user over at Instructables named walter.warren1.
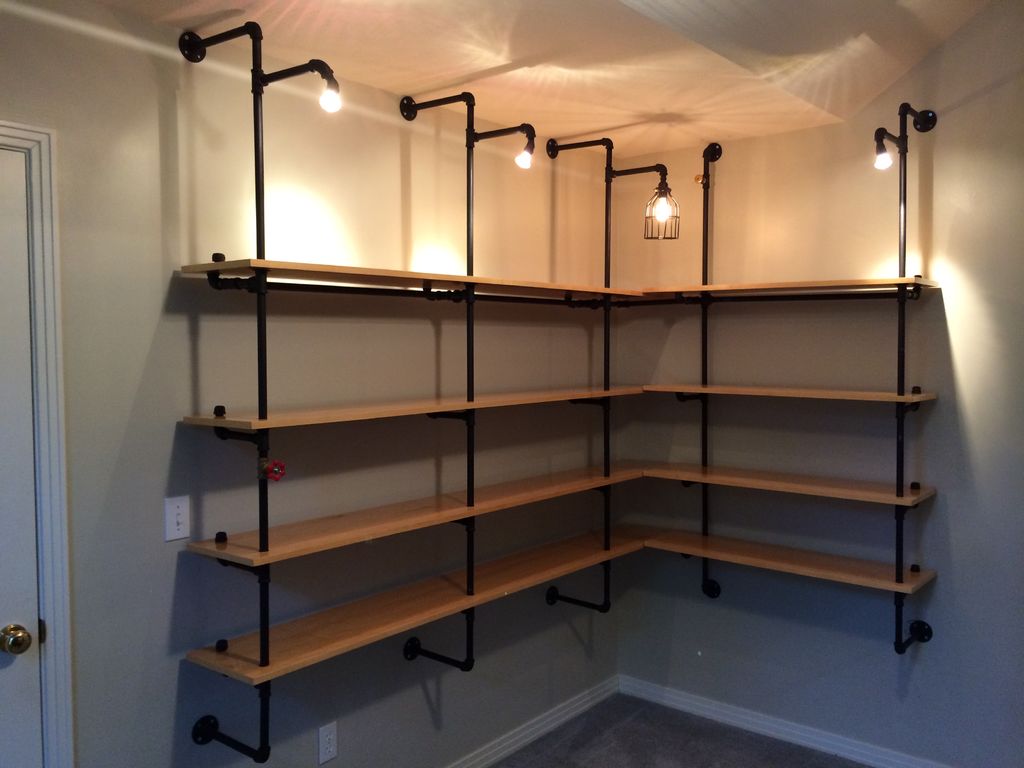
He has given an industrial approach to shelving design by virtue of recycled pipes, wood planks and multiple 12V lighting for a warm ambiance. Applying lighting at the upper end of the pipes supporting shelves not only gives a warm ambiance but also shows your book and photo collection in style. So here is a step-by-step tutorial of how to make a similar bookshelf at your home.
Step 1
First things first. At suggest by the DIYer, you need to be very clear about the design you want to make. You need to write everything down and make a blueprint of your design in order to make your DIY experience hassle-free.
Step 2
If you have 1/2″ pipes in your backyard, then you can use them. If not, then purchase them from market. Apart from that you will require (depending on the size of shelf) –
Two floor flanges to be mounted on the wall
- Tees
- 6″ nipple
- 90 elbows
- 1.5″ nipples
- Cap
- 3″ nipples
- Cross at interior brackets
- 10″ nipples
- 45 degree street fitting
- Bulb sockets and 1/4″-1/2″ bushings
Step 3
You are ready for the carpentry work once you are done with arranging all the items listed above. To start with, try to assemble pipe brackets and mount them temporarily on the wall in order to make markings.
Step 4
You need to arrange wood planks of same size for the purpose of shelving. Make sure they are neither very heavy nor too light that they break under the weight of books and photo frames.
Step 5
Drill holes in the shelves at right places for pipe supports.
Step 6
After drilling holes in the shelves, you need to give them finishing touch, i.e., smooth them with sandpaper to remove scuffs, dirt, or markings and apply edge banding for smoothness. And apply natural stain and 1-2 coats of gloss polyurethane for a finer look.
Step 7
We have shelves ready. Now we need to take down the brackets which we had temporarily mounted on the wall. Thread electricity wires through pipes in an upward direction. Start mounting shelves and screwing them one-by-one in same order.
Step 8
Keep length of wire long enough so that it reaches the nearest existing power source easily. Connect wires to the power source one all connection are set correctly.
Following these easy steps, you can build your own cool shelving system with built-in lights.

0 Comments.