


Installing hardwood in homes has become a popular trend over the last decade. But the thing is if you use solid hardwood lumber then definitely it is not going to last long. Even DIY fails to work successfully with solid hardwood as they are fragile.
But genuine hardwood can get through all rough and tough situations and can be repaired in case it is mistreated. The following blog post depicts step by step process to maintain, repair and replace the hardwood floor.
The following is a detailed description on some simple steps to repair the wooden floor.
##Wiping off the Spots
Over the time, the hardwood is likely to develop spots due to moisture problems or other problems that were not checked on time. The following steps can help you to remove dark spots and stains completely.
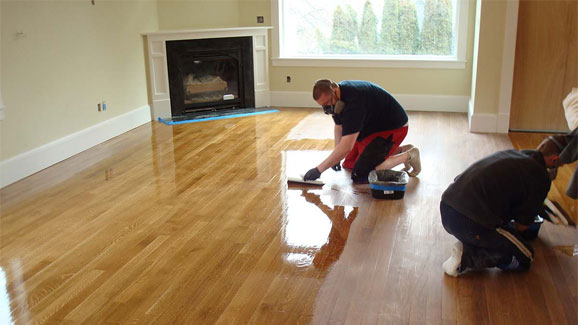
- You can start cleaning the area with coarse grit paper. To remove the finish, stain, and top surface of the damaged wood use a sander.
- For removing spots, a drum sander can be used and then strip off the finish from the whole floor and feather the edges.
- The next step is to restore the smoothness of the surface. Use finer grits to sand out the area from which the color has been removed and then feather the edges.
- Then remove the dust with the help of a tack cloth and mineral spirits. You may even have to do this process repeatedly, by letting the floor dry completely in intervals.
To restore the wood’s finish color use wood stain like oil stain is the best alternative. If you are doubtful about it you can consult a paint specialist at your local home center.
To get a clear finish you can apply polyurethane or spar varnish using a lamb’s wool for large portions and soft bristle brush for small areas.
Tip! While doing the process, make sure you wear a respirator mask and use odorless mineral spirits to keep yourself away from inhaling fumes.
##Repairing Minor Damages
If you are using engineered hardwood, then it would be difficult to repair but solid lumber woods can be easily filled for damages.
- Sand the repair area and remove loose finishing and splintering.
- Then again clean the dust with a tack cloth and odorless mineral spirits.
- Then fill the damaged and stained area with solvent-based wood filer rated for stain. After the filer has hardened, sand the filled repair.
Tip! If your floor has multiple damaged spots, drum sanding is the best option. Restore the color and finish as outlined above to complete the repair.
##Replacing Damaged Boards
In some cases, a single floor board or several adjacent boards may become too stained or damaged that simply cleaning or repair won’t help. Such cases, can only be helped with replacement of the floor with a little bit of patience.
- Take a circular saw and cut the damaged board ½ inch from each long edge, parallel to the edge along its whole length. Set the depth to the thickness of the floor board.
- Then with the aid of hammer and chisel, pull the strip in the center of the damaged board. After removing it, take out the remaining edge pieces with a hammer and chisel.
- Cut the bottom lip from the groove edge of your repair board with the help of a table saw, router, or circular saw so that it can be kept on top of the existing “tongue” on the board below the damaged board. Make sure the board fits in the length.
- Then place the board in the space where the damaged board was placed. If you are apt with the measurements then the board will fit in tight and will require no fastening. The floor finish will stick the board in the right place.
- In case the board appears loose, then use a pin nail gun to make the new board fit into the new space.
Tip! For better maintenance and care, consult a good professional.

0 Comments.